
It is important to learn how to take shallow depthof field photos. You can achieve this by learning the different techniques and by understanding the various variables involved. For example, the depth of the field is determined by the f stop value and the distance between subject and camera. Charts can be used to calculate the f stops. Finally, you need to understand how to set your shutter release for different depths.
Techniques for getting shallow depth of Field
Shallow depth-of-field is an important technique to focus your camera's lens on a specific area of your subject. This technique guides the viewer's eyes to the most exciting parts of an image. You can also blur the background, creating a sense that there is depth to the photograph.
Shallow depth of field can be achieved with a wide aperture or with a smaller one. A larger aperture lets more light into the sensor, which leaves less area of focus. A wide aperture lens is a popular choice for portrait photography, but you don't have to use a wide-angle lens to get this look. A simple way to achieve shallow depth of focus is to change the aperture. You can also use neutral density filters if your focal length is not important.
You can also increase the distance between your subject and your camera to achieve shallow depth of field. If you don't own a wide aperture lens, you can still achieve this effect by zooming in but moving away. For example, if you're taking a photograph of a tree, try standing 20 feet away from it. Distance between the subject and the tree will create a soft background.
Charts for determining f-stop value
To achieve shallow depth-of-field photographs, you will need to increase the aperture. This technique is great for portraiture and allows more light through the lens. These are also known to be shallow depth of focus photographs.

A depth chart is a tool that can help you determine the depth of field value. These charts can show you the depth of the subject as well as the fstop. They can also printed out and laminated. It is crucial that you use the correct chart to suit your particular lens.
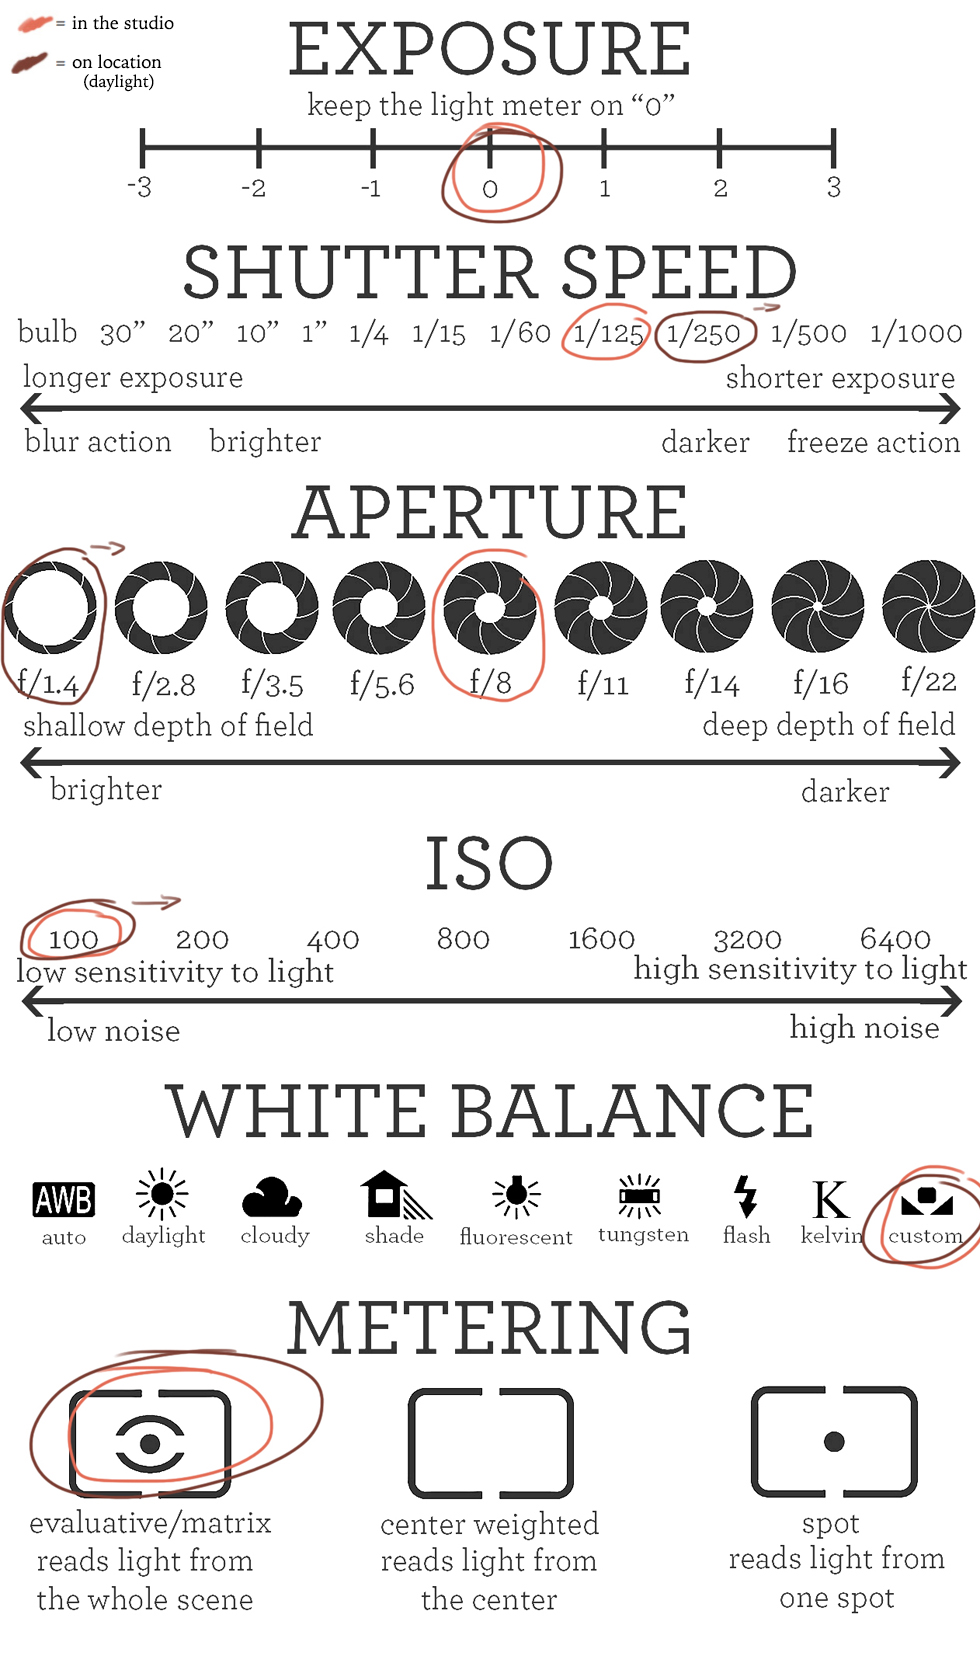
Generally, fstops are measured in thirds. The smallest aperture size is f/8, while the largest is f/16. The lens will receive more light if it has a larger aperture. Choosing a lens with a large aperture size will allow you to capture more detail and contrast. Using a smaller aperture will minimize the amount of blurring or focusing in the photo, which will allow you to capture a shallower depth of field.
Distance between camera and subject
It is important to determine the distance between subject and camera in order to create a deep field photo. With the changing apertures, the out-of focus areas of the lenses will dramatically change due to light passing through them. The distance between the subject and the camera will also affect how much of the out-of-focus area is in focus. A larger aperture will result in a wider DOF. Conversely, a smaller aperture will result in a narrower DOF. In order to change the DOF, a photographer can adjust the aperture, move closer to the subject or change the focal length.
While the distance between the subject and the camera may vary, it is generally true that the deeper the depth will be for subjects closer to the camera. A close-up portrait could have a background that is too blurred, while a landscape shot might have trees and a nearby river as the foreground. Mountainous areas may also be out in focus. The distance between subject and camera narrows as light passes through the lens. The far DoF therefore is more than the near DoF.
Focal length
Your focal length is a key factor in depth-of-field photography. Not only does focal length affect the subject's depth, but it also affects how sharp your image is. A longer lens will result in a shallower DOF.
You must determine the distance of the subject from the lens to calculate your DOF. This is called the depth-of field ratio. The more distant the subject is from the camera, the larger the depth of field. You can also increase DOF by opening or moving the aperture. It is important to keep in mind that the focal length must double if the subject is twice as far away. This means that the focal length is twice as important as the f/stop when it comes to defocusing.
Long focal lengths can make the background look larger than the foreground. A narrower angle of vision makes the background appear sharper.
Focus distance
Focus should be maintained on the main subject when taking depth-of-field photographs. This will draw attention naturally. However, the photographer must also decide how much of the background and foreground should be in focus. The distance from the background to the foreground's closest point and the farthest is called the depth-of-field.
The subject will be more in focus the deeper the depth of the field. Different focal distances in depth can help the subject appear closer or further away. You can blurr the background by changing your focus distance.
FAQ
Is photography a talent or a skill?
Photography isn't a talent, it's an art form that takes practice, training, as well as experience. You need to practice for years before you can master any part of the craft.
You need to plan how you will make money in photography.
To achieve this, it is important to first understand the kind of clients that you wish to attract and then find ways to reach them.
You need to know who they are and what they want. To persuade them, you must communicate clearly and persuasively.
This means that potential clients will require you to be well-organized.
You will need to have a portfolio of work before you can approach potential customers. You can either create a portfolio digitally with software programs, or print it on paper.
After you have built a portfolio, it is time to look for ways to showcase it. This could be by approaching businesses directly, or even advertising online.
Should I get into photography as an interest?
Photography is an excellent way to capture memories and share them with friends and family. You can also learn about the world around your camera.
You can find many online resources to help you learn how to take better photographs.
Consider enrolling at local art schools or community colleges. This will allow you to network with other photographers who can give valuable feedback on your work.
What camera is the best for beginners, and why?
The best camera choice for beginners is determined by your budget, skills, and needs.
For example, if you're looking to save money, you might choose a point-and-shoot digital camera. These cameras aren't as versatile as they look, but they provide good quality.
Digital Single Lens Reflex cameras come with interchangeable lenses which allow you to capture different types of images. These are typically more expensive than point-and-shoots, but they provide much greater flexibility.
A beginner's package is a great way to get started in photography. The package includes everything you need: a camera, lens, memory cards, tripod, flash and a camera body.
You should also remember to buy additional batteries.
Cameras for Sale
There are many online places where you can purchase cameras. B&H Photo Video is a reliable retailer. Their knowledgeable staff can answer any questions that you might have.
B&H also ships quickly and securely, making it easy to get your order delivered to your door.
This video will help you learn more about buying cameras.
Do I Need A Tripod?
This is one of those common questions. While a tripod may not be necessary all the time, it can prove to be extremely useful.
It can be used to steady your camera while you take slow shutter speeds pictures. A tripod can be very useful if you want to photograph landscapes and stationary subjects.
However, using a tripod to photograph moving subjects like people or sports can result in blurriness. How do you determine which situations need a tripod?
A tripod is useful in situations where you want to take pictures of fast action and stationary subjects. Examples include:
-
Sports
-
People
-
Landscapes
-
Close-ups
-
Macro shots
Try this test to find out if you really need a tripod. Take your camera and hold it still. Then, look through the scope. If you see blurred lines or movement, then you definitely need a tripod.
A tripod won't make any difference if there is no blurring.
If you do decide on a tripod purchase, these are some things to remember.
-
You should ensure that your tripod has smooth legs. This prevents unwanted vibrations from shaking your camera.
-
A tripod is a good choice. Some tripods can be made out of plastic but they are not very durable. Consider a tripod made of metal.
-
Consider purchasing a remote release. This lets you control your camera remotely. The button can be pressed to activate the shutter.
-
Try to find a tripod with a head that rotates 360 degrees. This makes it easier for you to position your camera horizontally, or vertically.
-
Tripods are expensive. Expect to spend between $100 and $200. But, you will get a lot for your buck.
-
Accessories such as filters and memory cards should be considered.
-
Before you buy online, make sure to check your local shops. Many retailers offer free shipping.
-
Read reviews to determine what customers think about a particular product.
-
Ask friends and family members who own similar products.
-
For customer feedback, visit message boards and forums.
-
Look online for user reviews.
-
Amazon.com allows you to compare prices, and receive customer feedback.
-
Take a look at these photo galleries to see what other photographers do with tripods.
What is rule of thirds for photography?
The rule of thirds can be used to create beautiful compositions, without having to use complicated camera settings. It divides your image into nine equal parts, horizontally and vertically. This creates three main areas where you want your subject to appear. These are the top (upper left corner), middle (center) and bottom (lower right). These areas are useful for positioning your subject in your frame.
The rule of thirds also helps you avoid placing important elements too close together or too far apart. If they are too close to each other, it may be difficult for them to make a strong visual impression. If they are placed too far apart, it can cause them to lose focus.
How can my phone improve my photo skills?
You don't need expensive equipment to take great photos! Amazing images are possible with just a smartphone.
It's easy to get started with the software.
There are many apps for iOS and Android devices that can edit and share pictures.
Here are five tips for taking better pictures.
-
Set Up Your Camera App. Your device should already have your camera app installed. If it is not installed, you can download it from Google Play.
-
Use filters and effects. Filters and effects allow you to change the appearance of your photo without having to touch your image.
-
Adjust the Exposure. You can control the brightness by changing your exposure.
-
Take the right lighting. It is easier to see details when you shoot in bright light. Shooting in low light conditions lets you capture the shadows and highlights in your image.
-
Photograph People. It is a great way to share your love with others by taking pictures of them.
You can learn more about how to capture better photos by checking out our article, 5 Tips To Improve Your Photography Skills on a Smartphone
Statistics
- In this case, 100% of readers who voted found the article helpful, earning it our reader-approved status. (wikihow.com)
- By March 2014, about 3 million were purchased monthly, about 30 percent of the peak sales total. (en.wikipedia.org)
- While I cannot prove that all of those spots were not sensor dust, the photo was taken during a heavy snowstorm…so I guess that 99.8% of the spots are snowflakes. (bhphotovideo.com)
- This article received 13 testimonials, and 100% of readers who voted found it helpful, earning it our reader-approved status. (wikihow.com)
External Links
How To
How to take macro shots in photography
Macro photography is the ability to capture small objects, such as insects and flowers, at close range. Macro comes from the Greek makros (makros) which means large. It is possible to capture images of very close objects if you have a lens with a focal range greater than 50mm.
A good macro lens must have a long work distance and a fast aperture so that sharp images can be captured without having to move around. Also, avoid moving while taking photos as it could blur your image.
Here are some tips and tricks to make great macro shots:
-
Use a tripod. You can use a tripod if you don't own one. This way, you'll have less chance of moving while trying to shoot.
-
Choose the right lighting. You can get a macro lens with built-in lights filters. However, if you don’t have one, you can purchase one. This helps prevent overexposure.
-
Be patient! Shooting macros takes practice. Sometimes you may only see a tiny bug or flower, but it's worth it to keep shooting until you catch it.
-
RAW is the best format for shooting. RAW files have more data than JPEGs. They can store more detail. RAW files are better for editing later as you can make adjustments such as cropping and colour correction.
-
It's important to remember the background. The background can sometimes add interest to your shot even though it is a foreground item. It's worth including it in your photograph.
-
Keep learning.