In photography, camera exposure is the amount of light that reaches the film or image sensor during a shutter cycle. In general, photos that are underexposed turn out too dark and shots that are overexposed too bright. To achieve better results, you can adjust your exposure settings. Here are some basic tips to get your started. Read on to learn more. This article is for beginners who want to learn about the basics and techniques of camera exposure. We hope that you find the following information useful.
Adjusting the shutter speed
Shutter speed and aperture settings are usually in sync. Both affect the light entering your camera and the lighting in the photograph. These settings can have dramatic impact on the outcome of a photo. This article will help you to take better photos by explaining the basics of aperture and shutter speed. But before we get into that, let's briefly review the relationship between the two.
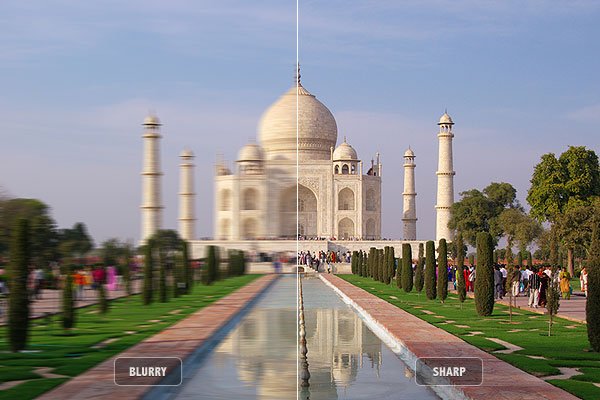
You can change the shutter speed to expose your film or sensor for longer exposures than when it was taken at the same exposure. This is why shutter speeds of 1/100th to one second are considered slow. It is essential to choose the right shutter speed depending on the situation and subject of your photo. Avoid shooting in windy situations. Keep your shutter speed between 1/100 and 1/50 seconds.
Aperture
Your camera's aperture settings determine how much light reaches your sensor. The aperture on a camera is a lens that adjusts to allow light in, similar to the pupil of a human eye. The aperture will open wider in dim light while it will close tightly under brighter lighting. Your camera's aperture setting, also known as f stops, is a measure of light sensitivity. The rule is that the smaller the number, the larger your aperture.
Auto bracketing is an easy way to avoid under or overexposed photos. It's a simple and effective method to achieve optimal exposure. This involves taking three exposures with the same composition at different Evs. Press the shutter and release. The camera will then make the appropriate adjustments. You can compare the results from each exposure later and determine which one is most accurate. To avoid the risk of taking too many images, use auto bracketing whenever possible.
ISO value
DSLR photography enthusiasts will be familiarized ISO, which stands for International Organization for Standardization. This regulates the camera's sensitivities to light. This affects the quality and brightness of the images. High ISO settings make the sensor more sensitive to light, allowing you to take photos in low-light conditions. These settings can result in increased noise, which decreases the quality of your image. The best way to adjust ISO is to experiment with different settings and find what works best for your own photos.
Camera exposure is heavily influenced by ISO values. They affect the amount and quality of grain and motion blur. It is also important to understand that ISO values are independent of shutter speed. Combining them would create an underexposed picture. It isn't as easy as changing the shutter speed or aperture. They are used to control depth of field and sharpness. Instead, ISO controls the brightness of a picture by controlling the incoming light and controlling the amount of grain in the picture.

Light metering
The first thing to know about light metering for camera exposure is that it goes hand in hand with exposure. By understanding how light affects the photo, you'll be able to properly expose your scene, maximizing the quality of the picture in-camera and saving time in post-processing. This article will discuss the different types of metering and their differences. Here are some of the most common types:
It might seem that a dark background will make your photo look too dark. But it isn't. Your subject will reflect more light into the camera if it is white. The camera may underexpose the photo if it gets too bright from the light meter. This is why it's important to use multiple exposures when adjusting the exposure on your camera. Otherwise, you may end up shooting photos that are overexposed.
FAQ
What equipment is necessary to begin digital photography
The first thing you should consider when starting out in digital photography is what type of camera you want to use. There are many choices, including DSLRs (digital one-lens reflex cameras), point and shoot compact cameras, camcorders, smartphones, and camcorders. Each offers different features and benefits. DSLR cameras are more expensive and weigh more than other types of cameras. Point-and shoot cameras are smaller, lighter and have more automatic settings. Camcorders provide excellent video recording capabilities and may also feature still photo shooting modes. Smartphones are small, light, and easy to carry around and offer great image quality and many advanced features such as GPS mapping, music playback, and Internet browsing.
Once you've chosen the type of camera that you want, you can decide whether to purchase a used or new model. Cameras that have been used in recent years can often be found for a reasonable price. New models generally cost more because manufacturers spend large amounts of money developing new technology.
Next, purchase lenses. Lenses are crucial in determining the quality and appearance of your photos. They enable you to adjust the focal length of the lens so that you can zoom into the scene with no loss of focus. Some lenses have built-in flash units, while others require external flash units. Many brands offer many lenses with unique characteristics.
Finally, memory cards are something you should consider. Memory cards store photos taken by your camera. Your card's size will determine how many pictures it can store. Multiple memory cards will be required if your plan is to take lots of pictures.
Cameras: Where to Buy?
There are many places online that you can purchase cameras. B&H Photo Video is a reliable retailer. Their knowledgeable staff can answer any questions that you might have.
B&H ships securely and quickly, so you can get your order delivered right at your door.
You can learn more by watching this video about shopping for cameras.
Photography is a talent?
Photography isn't a talent, it's an art form that takes practice, training, as well as experience. To master any aspect of photography, it takes years of practice and study.
You need to plan how you will make money in photography.
To do this, you need to understand what kind of clients you want to attract and find ways to reach them.
You must know their identity and what they want. It is important to communicate clearly and convincingly with them in order to convince them to use your services.
This means that you will need to be well-organized and prepared when you meet potential clients.
A portfolio of your work is essential in order to be able to approach potential clients. This can be done electronically using software programs or printed on paper.
Once you have created your portfolio, you need to find opportunities to display it. You could approach businesses directly or post ads online.
What makes a camera bag good?
A camera bag protects your gear and is essential when traveling. Here are some factors to keep in mind when choosing a bag.
-
You should choose a large bag that can hold your accessories and camera comfortably. Don't get any bigger than you really need.
-
Durability: Bags made of durable materials such leather, canvas and nylon are best. Avoid fabric and plastic bags.
-
Protection: Make sure your bag protects against dust, dirt and moisture.
-
Organization: Sort your gear by type in order to make it easy to access the items you need. You could, for example, place your lenses in one area, your memory card in another and your battery charge in yet another.
-
Comfort: Keep your hands free when shooting by using a shoulder strap instead of a handbag. Also, look for a comfortable design with padded straps.
-
Price: Check around to find the best prices. Discounts are sometimes offered by some brands, which can be a bonus.
-
Warranty: Make sure to ask if they offer a warranty for their products. This will ensure that you are able to contact the right person if something happens to your bag.
Do I Need A Tripod?
This is one those questions that everyone has to ask. The truth is that a tripod isn't always necessary, but it can come in handy.
A tripod allows you to stabilize your camera when taking photos at slow shutter speeds. If you're shooting landscapes or other stationary subjects, then a tripod can make a big difference.
A tripod can also cause blurriness when you are photographing people or sports. How can you tell which situations call for a tripod and why?
A tripod can be useful in any situation where you need to capture fast action or stationary subjects. Examples include:
-
Sports
-
People
-
Landscapes
-
Close-ups
-
Macro shots
Do this test to see if you are unsure if you require a tripod. Take your camera and hold it still. Then, look through the scope. If blurred lines appear or you feel movement, you will definitely need a tripod.
A tripod won't make any difference if there is no blurring.
However, if you do decide to invest in a tripod, here are some tips to keep in mind.
-
Your tripod should have smooth legs. This will stop unwanted vibrations shaking your camera.
-
Use a sturdy tripod. Some tripods made of plastic may not last very long. Opt for a sturdy metal tripod.
-
You may want to consider buying a remote-control device. Remote control allows you to remotely control your camera. You can set it to fire the shutter once you press the button automatically.
-
You should look for a tripod with 360 degree rotation. This makes it much easier to position your cameras horizontally or vertically.
-
Tripods are expensive. Expect to pay around $100-200. You will still get a lot out of your money.
-
Accessories like memory cards and filters should not be forgotten.
-
Check your local stores before buying online. Many retailers offer free shipping.
-
Check out customer reviews to learn what they think about a product.
-
Ask family members or friends to share similar products.
-
Visit forums and message boards to learn about customer experiences.
-
You can search online for reviews from other users.
-
Amazon.com allows you to compare prices, and receive customer feedback.
-
See photo galleries to see some of the creative uses for tripods by photographers.
How can I become a professional photographer?
Photography is an art that takes patience, dedication and passion. If you love photography, you'll be doing better than if only you were going after the money.
You must learn how to use your digital camera correctly. It is important to understand the basics of composition, lighting and exposure. A good understanding of Photoshop is also necessary.
It is hard to master photography, but it is worth the effort.
If you want to improve your skills, then read books on the subject, attend classes and take part in competitions. This will allow you to gain confidence and experience which will result in improvement. What equipment do I need?
It really depends on what kind of photography you like to do. A wide-angle lens is necessary for landscape photography.
You should invest in a Telephoto Lens if you love portrait photography.
A tripod is essential when taking photographs. It allows you to stand back and compose your picture without moving around.
A camera bag is useful for carrying your camera, memory cards, and other accessories.
If you're using a compact camcorder, a flash device is essential.
A DSLR (Digital Single Lens Reflex), camera is the best choice for novice photographers who wish to create professional-quality images.
DSLRs are highly popular for their ability to control every aspect of a photo, such as shutter speed and aperture, ISO sensitivity, white-balance, focus, and white balance. These cameras also offer a variety of features, such as autofocus (auto-exposure locking), self-timer bracketing and RAW format.
Which Lenses Are Best?
Beginners often ask, "What lens should I purchase?" Because there are so many options, it can be difficult to choose.
The good news? You don’t have to purchase a completely new lens for every new camera you buy. You can instead add lenses later.
For starters, here are three types of lenses you might want to consider.
-
Wide Angle Lens (14mm-24mm): These lenses have a wide view angle that will allow you to capture more of your subject. You can zoom in and not lose image quality.
-
Normal/Standard Zoom Lens (28mm - 70mm): These lenses allow you to change focal lengths while maintaining image quality.
-
Telephoto Zoom Lens (70mm, 200mm): These lenses work well for distant subjects. These lenses allow you stay focused on your subject even when they appear small.
Combining lenses can create different effects. Combining lenses can create different effects. For example, a normal lens could be used to capture small details while a telephoto lens is used to capture faraway objects.
Statistics
- That's the easiest way to get blurry photos 100% of the time. (photographylife.com)
- There are people out there who will pick at flaws they can only see in 100% crops of your photos. (wikihow.com)
- By March 2014, about 3 million were purchased monthly, about 30 percent of the peak sales total. (en.wikipedia.org)
- The second easiest way to get blurry photos 100% of the time is to use a cheap filter on the front of your lens. (photographylife.com)
External Links
How To
How to take macro shots in photography
Macro Photography refers to the ability take pictures of small objects like insects and flowers at close range. Macro means large in Greek. A lens with a focal length over 50mm can be used to take photos of objects very close up.
A macro lens of high quality should have a large working distance and an aperture fast enough to produce sharp images. Because of the possibility of blurring your image from movement, you should avoid taking photos while moving.
Here are some ways to get great macro photos
-
Use a tripod. Use a tripod. This will ensure that you have less movement while shooting.
-
Pick the right lighting. You can get a macro lens with built-in lights filters. However, if you don’t have one, you can purchase one. This prevents excessive exposure.
-
Be patient! Shooting macros takes practice. It's not always easy to see the perfect macro, but it is worth trying until you do.
-
RAW files are best for shooting. RAW files have more data than JPEGs. They can store more detail. RAW files can be edited later and allow for more detail such as cropping and color correction.
-
Don't forget the background. Even though you've got a nice foreground object, sometimes the background adds interest to your shot. Try to include it in your photo.
-
Keep learning.